C++与Python3互相调用
C++调用Python3
使用python提供给C/C++的API
链接到Python调用库
在CMakeLists.txt添加头文件和动态库位置
1
2
3
4
find_package(Python3 COMPONENTS Interpreter Development REQUIRED)
add_executable(TestC__ main.cpp)
include_directories(${Python3_INCLUDE_DIRS})
target_link_libraries(TestC__ ${Python3_LIBRARIES})
有参python函数调用
python
# myadd.py
def AdditionFc(a, b):
    print("Now is in python module")
    print("{} + {} = {}".format(a, b, a+b))
    return a + b
C++
void Driver::RunOptimal(std::map<std::string,std::string>args){
    //1、初始化python接口
    Py_Initialize();
    //初始化使用的变量
    PyObject*pModule=NULL;
    PyObject*pFunc=NULL;
    PyObject*pName=NULL;

    //2、初始化python系统文件路径,保证可以访问到.py文件
    PyRun_SimpleString("import sys");
    PyRun_SimpleString("sys.path.append('/home/z00621429/tmp/tmp.HqoPyMR7Oz/lib')");

    //3、调用python文件名。当前的测试python文件名是myadd.py
    //在使用这个函数的时候,只需要写文件的名称就可以了。不用写后缀。
    pModule=PyImport_ImportModule("myadd");

    //4、调用函数
    pFunc=PyObject_GetAttrString(pModule,"AdditionFc");

    //5、给python传参数
    //函数调用的参数传递均是以元组的形式打包的,2表示参数个数
    //如果AdditionFc中只有一个参数时,写1就可以了
    PyObject*pArgs=PyTuple_New(2);

    // 第一个参数,传入int类型的值2
    PyTuple_SetItem(pArgs,0,Py_BuildValue("i",2));
    // 第二个参数,传入int类型的值4
    PyTuple_SetItem(pArgs,1,Py_BuildValue("i",4));

    //6、使用C++的python接口调用该函数
    PyObject*pReturn=PyEval_CallObject(pFunc,pArgs);

    //7、接收python计算好的返回值
    intnResult;
    //i表示转换成int型变量。
    //在这里,最需要注意的是:PyArg_Parse的最后一个参数,必须加上“&”符号
    PyArg_Parse(pReturn,"i",&nResult);
    std::cout<<"returnresultis"<<nResult<<std::endl;

    //8、结束python接口初始化
    Py_Finalize();
}
编译

Python3调用C++
Python调用C++的方式包括但不限于以下几种:
1) 使用ctypes模块:ctypes是Python标准库中的一个模块,可以用来调用动态链接库中的C函数。可以将C++代码编译成动态链接库,然后在Python中使用ctypes调用其中的函数。 2) 使用SWIG:SWIG是一个开源工具,可以将C++代码转换成Python模块。使用SWIG可以将C++代码封装成Python模块,然后在Python中直接调用。 3) 使用Boost.Python:Boost.Python是一个C++库,可以将C++代码封装成Python模块。使用Boost.Python可以将C++代码封装成Python模块,然后在Python中直接调用。 4) 使用Cython:Cython是一个Python扩展模块,可以将Python代码转换成C代码,然后编译成动态链接库。可以使用Cython将C++代码封装成Python模块,然后在Python中直接调用。
使用ctypes调用C++
步骤:
1) 编写C/C++程序; 2) 将C/C++程序编译成动态库; 3) 在Python中调用编译生成的库。
编写C++程序
由于C++支持函数重载,在g++以C++方式编译时编译器会给函数的名称附加上额外的信息,这样ctypes模块就会找不到g++编译生成的函数。 因此,要让g++按照C语言的方式编译才可以找到生成的函数名。让编译器以C语言的方式编译就要在代码中使用extern关键字将代码包裹起来。
#include <iostream>
#include <vector>

class Test {
private:
    double _calculate(int a, double b);

public:
    double calculate(int a, double b, char c[], int *d, double *e, char **f);
};

double Test::_calculate(int a, double b) {
    double res = a + b;
    std::cout << "res: " << res << std::endl;
    return res;
}

double Test::calculate(int a, double b, char c[], int *d, double *e, char **f) {
    std::cout << "a: " << a << std::endl;
    std::cout << "b: " << b << std::endl;
    std::cout << "c: " << c << std::endl;
    std::cout << "d: " << d[0] << d[1] << std::endl;
    std::cout << "e: " << e[0] << e[1] << std::endl;
    std::cout << "f: " << f[0] << f[1] << std::endl;
    return this->_calculate(a, b);
}


// 封装C接口
extern "C" {
// 创建对象
Test *test_new() {
    return new Test;
}
double my_calculate(Test *t, int a, double b, char c[], int *d, double *e, char **f) {
    return t->calculate(a, b, c, d, e, f);
}
}
将C/C++程序编译成动态库
将上面的代码编译成so文件
g++ -shared -Wl,-soname,test -o test.so -fPIC test.cpp
编译参数说明:
- -shared:生成共享库文件;
- -Wl,-soname,test:指定共享库的 soname 为 test;
- -o test.so:指定输出文件名为 test.so;
- -fPIC:生成与位置无关的代码,用于动态链接库。
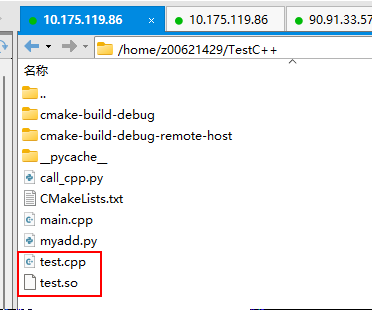 同级目录下生成
test.so文件。
在Python中调用编译生成的库
1
2
3
4
5
6
7
8
9
10
11
12
13
14
15
16
17
18
19
20
21
22
23
24
25
26
27
28
29
30
31
32
33
34
35
36
37
38
39
40
41
42
43
44
45
46
47
48
49
# call_cpp.py文件
import ctypes
# 指定动态链接库
lib = ctypes.cdll.LoadLibrary('./test.so')
#需要指定返回值的类型,默认是int
lib.my_calculate.restype = ctypes.c_double
class Test(object):
def __init__(self):
# 动态链接对象
self.obj = lib.test_new()
def calculate(self, a, b,c,d,e,f):
res = lib.my_calculate(self.obj, a, b,c,d,e,f)
return res
#将python类型转换成c类型,支持int, float,string的变量和数组的转换
def convert_type(input):
ctypes_map = {int:ctypes.c_int,
float:ctypes.c_double,
str:ctypes.c_char_p
}
input_type = type(input)
if input_type is list:
length = len(input)
if length==0:
print("convert type failed...input is "+input)
return null
else:
arr = (ctypes_map[type(input[0])] * length)()
for i in range(length):
arr[i] = bytes(input[i],encoding="utf-8") if (type(input[0]) is str) else input[i]
return arr
else:
if input_type in ctypes_map:
return ctypes_map[input_type](bytes(input,encoding="utf-8") if type(input) is str else input)
else:
print("convert type failed...input is "+input)
return null
if __name__ == '__main__':
t = Test()
A1 = 123;
A2 = 0.789;
A3 = "C789";
A4 = [456,789];
A5 = [0.123,0.456];
A6 = ["A123", "B456"];
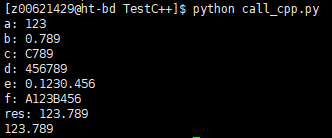
print(t.calculate(convert_type(A1), convert_type(A2), convert_type(A3),convert_type(A4),convert_type(A5),convert_type(A6)))
运行call_cpp.py,结果如下:
使用SWIG调用C++
SWIG(Simplified Wrapper and Interface Generator)是一个开源的软件工具,用于将C/C++代码转换为其他高级编程语言(如Python、Java、Ruby等)的接口。SWIG可以帮助开发人员将现有的C/C++代码集成到其他语言的应用程序中,从而提高代码的重用性和可移植性。 由于SWIG是开源软件,存在潜在的风险(安全漏洞、不稳定性、兼容性问题等),在项目中不做考虑。
使用Boost.Python调用C++
在Python中,直接使用C语言代码是很容易的,用ctypes即可。 而如果需要使用C++的类、对象、方法、虚函数等高级语言特性,则没那么简单。而 Boost::Python 就是一个高度封装好的 Python / C API,它能简化 C++ 代码,使得为 Python 编写 C++ 扩展更为简单方便。甚至还能以 OOP 风格在 C++ 中编写 Python 对象的操作。 用Boost做Python 和 C++ 接口的好处是不用修改C++的代码,只需要单独再写一个wrapper就好了,很方便。
安装Boost库
Boost官网 首先,安装Boost库。机器上有装好的Boost,这里略过安装。 查看Boost版本:cat /usr/include/boost/version.hpp | grep "BOOST_LIB_VERSION"

注意:Python版本与Boost版本的匹配。这里Boost版本是1_53,对应Python2。Python3需升级Boost,使用方式不变。 下面的例子都是用Python2来演示。
导出简单函数
实现test2.cpp如下
#include <boost/python/module.hpp>
#include <boost/python/def.hpp>
using namespace boost::python;

int Add(const int x, const int y)
{
    return x + y;
}

int Del(const int x, const int y)
{
    return x - y;
}

BOOST_PYTHON_MODULE(test2)
{
    def("Add", Add);
    def("Del", Del);
}
其中,BOOST_PYTHON_MODULE的参数为要导出的模块名字,编译命令如下:
1
g++ test2.cpp -fPIC -shared -o test2.so -I/usr/include/python2.7 -I/usr/local/include -L/usr/local/lib -lboost_python
注意: 编译时需要指定boost头文件和库的路径,我这里分别是/usr/local/include和/usr/local/lib
同级目录下,生成test2.so
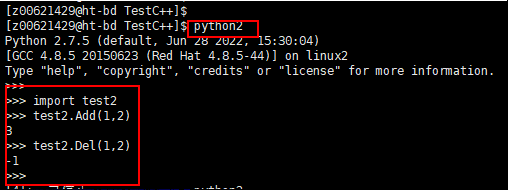
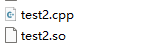 进入该目录,验证如下:
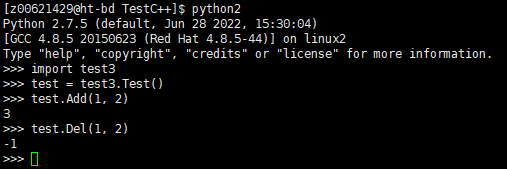
导出类
test3.cpp实现如下:
#include <boost/python.hpp>
using namespace boost::python;

class Test
{
    public:
        int Add(const int x, const int y)
        {
            return x + y;
        }

        int Del(const int x, const int y)
        {
            return x - y;
        }
};

BOOST_PYTHON_MODULE(test3)
{
    class_<Test>("Test")
        .def("Add", &Test::Add)
        .def("Del", &Test::Del);
}
编译:
1
g++ test3.cpp -fPIC -shared -o test3.so -I/usr/include/python2.7 -I/usr/local/include/boost -L/usr/local/lib -lboost_python
测试如下
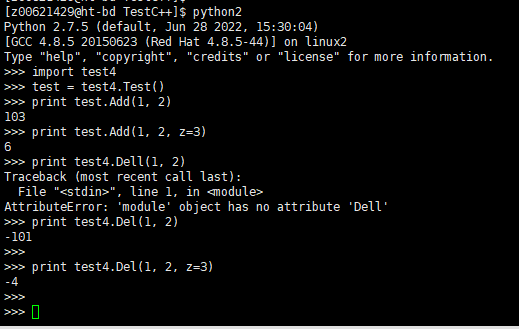
导出变参函数
test4.cpp实现如下
#include <boost/python.hpp>
using namespace boost::python;

class Test
{
    public:
        int Add(const int x, const int y, const int z = 100)
        {
        return x + y + z;
        }
};

int Del(const int x, const int y, const int z = 100)
{
    return x - y - z;
}

BOOST_PYTHON_MEMBER_FUNCTION_OVERLOADS(Add_member_overloads, Add, 2, 3)
BOOST_PYTHON_FUNCTION_OVERLOADS(Del_overloads, Del, 2, 3)

BOOST_PYTHON_MODULE(test4)
{
    class_<Test>("Test")
        .def("Add", &Test::Add, Add_member_overloads(args("x", "y", "z"), "something"));
    def("Del", Del, Del_overloads(args("x", "y", "z"), "something"));
    }
这里Add和Del函数均采用了默认参数,Del为普通函数,Add为类成员函数,这里分别调用了不同的宏,宏的最后两个参数分别代表函数的最少参数个数和最多参数个数
编译:
1
g++ test4.cpp -fPIC -shared -o test4.so -I/usr/include/python2.7 -I/usr/local/include/boost -L/usr/local/lib -lboost_python
测试如下:
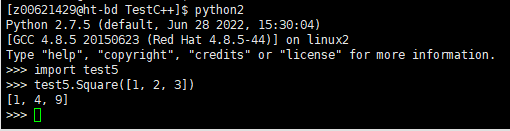
导出带Python对象的接口
既然是导出为Python接口,调用者难免会使用Python特有的数据结构,比如tuple,list,dict,由于原生态方法太麻烦,这里只记录boost的使用方法,假设要实现如下的Python函数功能。
1
2
3
4
def Square(list_a)
{
    return [x * x for x in list_a]
}
即对传入的list每个元素计算平方,返回list类型的结果,代码如下:
test5.cpp实现如下
#include <boost/python.hpp>

boost::python::list Square(boost::python::list& data)
{
    boost::python::list ret;
    for (int i = 0; i < len(data); ++i)
    {
        ret.append(data[i] * data[i]);
    }

    return ret;
}

BOOST_PYTHON_MODULE(test5)
{
    def("Square", Square);
}
编译:
1
g++ test5.cpp -fPIC -shared -o test5.so -I/usr/include/python2.7 -I/usr/local/include/boost -L/usr/local/lib -lboost_python
测试如下:
boost实现了boost::python::tuple, boost::python::list, boost::python::dict这几个数据类型,使用方法基本和Python保持一致,具体方法可以查看boost头文件里的boost/python/tuple.hpp及其它对应文件
另外比较常用的一个函数是boost::python::make_tuple() ,使用方法如下:
boost::python::tuple(int a, int b, int c)
{
    return boost::python::make_tuple(a, b, c);
}
使用Cython调用C++
CPython是C语言开发的Python解释器。在命令行下运行python就是启动CPython解释器。Cython支持Python与C/C++代码的无缝集成,可以直接调用C和C++的函数和库。
安装Cython
1
pip install Cython
简单样例
样例中总共需要五个文件:
Rectangle.hRectangle.cppRectangle.pxdsetup.pyrect.pyx
定义.h和.cpp文件
- Rectangle.h
#ifndef RECTANGLE_H #define RECTANGLE_H namespace shapes { class Rectangle { public: int x0, y0, x1, y1; Rectangle(); Rectangle(int x0, int y0, int x1, int y1); ~Rectangle(); int getArea(); void getSize(int* width, int* height); void move(int dx, int dy); }; } #endif - Rectangle.cpp
#include <iostream>
 #include "Rectangle.h"

 namespace shapes {

     // Default constructor
     Rectangle::Rectangle () {}

     // Overloaded constructor
     Rectangle::Rectangle (int x0, int y0, int x1, int y1) {
         this->x0 = x0;
         this->y0 = y0;
         this->x1 = x1;
         this->y1 = y1;
     }

     // Destructor
     Rectangle::~Rectangle () {}

     // Return the area of the rectangle
     int Rectangle::getArea () {
         return (this->x1 - this->x0) * (this->y1 - this->y0);
     }

     // Get the size of the rectangle.
     // Put the size in the pointer args
     void Rectangle::getSize (int *width, int *height) {
         (*width) = x1 - x0;
         (*height) = y1 - y0;
     }

     // Move the rectangle by dx dy
     void Rectangle::move (int dx, int dy) {
         this->x0 += dx;
         this->y0 += dy;
         this->x1 += dx;
         this->y1 += dy;
     }
 }
编写.pxd文件
pxd 文件可以看成是Cython(即pyx文件)的头文件。
- Rectangle.pxd
cdef extern from "Rectangle.cpp":
     pass

 # Declare the class with cdef
 cdef extern from "Rectangle.h" namespace "shapes":
     cdef cppclass Rectangle:
         Rectangle() except +
         Rectangle(int, int, int, int) except +
         int x0, y0, x1, y1
         int getArea()
         void getSize(int* width, int* height)
         void move(int, int)
编写.pyx文件
pyx是C/C++与Python之间的桥梁,也就是pyx文件会将C/C++代码做一层包装,方便Python直接调用。
rect.pyx
1
2
3
4
5
6
7
8
9
10
11
12
13
14
15
16
17
18
19
20
21
22
23
24
25
26
27
28
29
30
31
32
# distutils: language = c++

 from Rectangle cimport Rectangle

 cdef class PyRectangle:
     cdef Rectangle*c_rect  # hold a pointer to the C++ instance which we're wrapping

     def __cinit__(self, int x0, int y0, int x1, int y1):
         self.c_rect = new Rectangle(x0, y0, x1, y1)

     def get_area(self):
         return self.c_rect.getArea()

     def get_size(self):
         cdef int width, height
         self.c_rect.getSize(&width, &height)
         return width, height

     def move(self, dx, dy):
         self.c_rect.move(dx, dy)

     def __dealloc__(self):
         del self.c_rect

 def main():
     rec_ptr = new Rectangle(1, 2, 3, 4)  # Instantiate a Rectangle object on the heap
     try:
         rec_area = rec_ptr.getArea()
     finally:
         del rec_ptr  # delete heap allocated object

     cdef Rectangle rec_stack  # Instantiate a Rectangle object on the stack
第一行
# distutils: language = c++会指定当前文件生成C++文件。pxd和pyx文件可以简单如下来理解:- pxd文件是pyx与C/C++之间的桥梁;
pyx是C/C++与Python之间的桥梁。

创建setup.py
要编译Cython模块,必须有一个setup.py
from distutils.core import setup

from Cython.Build import cythonize

setup(ext_modules=cythonize("rect.pyx"))
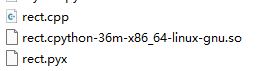
编译
1
python setup.py build_ext --inplace
执行命令后,在当前目录会生成rect.cpp,这个文件是根据rect.pyx生成的。同时还会生成rect.cpython-36m-x86_64-linux-gnu.so文件(Linux环境下对应so文件)。
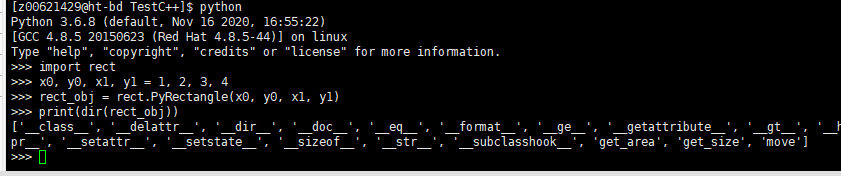
测试
工具比较
ctypes(Python自带的库)
- 灵活
- 对C的代码几乎无缝调用
- 使用起来比较繁琐
- C++需封装成C接口
Boost.Python
- 支持 Python 2, 3和C++的绑定
- 对于新手来说,学习它的语法有一定难度,但是这些语法很直观
- 大量使用了 C++ templates,会很明显地提高编译时间
- 随boost库一起发布,且boost库有用,但很大
- 刚开始编译使用boost.python封装好的C++代码时,出现的各种错误
- 一些语法不易学习,像函数返回值时的规则
- 非常可靠、稳定、经过充分测试的库
- 不支持属性
- 支持文档写得比较差,有些功能文档里甚至都没有写
- 编译后的pyd文件有些大,不利于在手机或者嵌入平台使用
- 配合py++使用,几乎可以全自动封装项目
Cython
- 基于Pyrex,很多外部库的扩展用它写的
- 性能较高
- 接近于Python语法
- 需学习Cython语法,编写
.pxd、.pyx文件,有学习成本 不太流行
ctypes SWIG Boost.Python Cython 功能 C++支持不太好,需手动封装 C++支持不太好 C++支持好,非常可靠 C++支持好 易用性 比较繁琐 容易学习 语法有一定难度 需学习Cython语法 可靠性 高 低 高 高 安全性 高 开源软件,低 高 高 引入外部库 无 无 boost库(很大) Cython 流行程度 流行 流行 流行 不太流行
=======
title: C++与Python3互相调用 date: 2024-08-26 15:40:00 +/-8 categories: [C++, Python] tags: [c++, python] # TAG names should always be lowercase —
C++调用Python3
使用python提供给C/C++的API
链接到Python调用库
在CMakeLists.txt添加头文件和动态库位置
1
2
3
4
find_package(Python3 COMPONENTS Interpreter Development REQUIRED)
add_executable(TestC__ main.cpp)
include_directories(${Python3_INCLUDE_DIRS})
target_link_libraries(TestC__ ${Python3_LIBRARIES})
有参python函数调用
python
# myadd.py
def AdditionFc(a, b):
    print("Now is in python module")
    print("{} + {} = {}".format(a, b, a+b))
    return a + b
C++
void Driver::RunOptimal(std::map<std::string,std::string>args){
    //1、初始化python接口
    Py_Initialize();
    //初始化使用的变量
    PyObject*pModule=NULL;
    PyObject*pFunc=NULL;
    PyObject*pName=NULL;

    //2、初始化python系统文件路径,保证可以访问到.py文件
    PyRun_SimpleString("import sys");
    PyRun_SimpleString("sys.path.append('/home/z00621429/tmp/tmp.HqoPyMR7Oz/lib')");

    //3、调用python文件名。当前的测试python文件名是myadd.py
    //在使用这个函数的时候,只需要写文件的名称就可以了。不用写后缀。
    pModule=PyImport_ImportModule("myadd");

    //4、调用函数
    pFunc=PyObject_GetAttrString(pModule,"AdditionFc");

    //5、给python传参数
    //函数调用的参数传递均是以元组的形式打包的,2表示参数个数
    //如果AdditionFc中只有一个参数时,写1就可以了
    PyObject*pArgs=PyTuple_New(2);

    // 第一个参数,传入int类型的值2
    PyTuple_SetItem(pArgs,0,Py_BuildValue("i",2));
    // 第二个参数,传入int类型的值4
    PyTuple_SetItem(pArgs,1,Py_BuildValue("i",4));

    //6、使用C++的python接口调用该函数
    PyObject*pReturn=PyEval_CallObject(pFunc,pArgs);

    //7、接收python计算好的返回值
    intnResult;
    //i表示转换成int型变量。
    //在这里,最需要注意的是:PyArg_Parse的最后一个参数,必须加上“&”符号
    PyArg_Parse(pReturn,"i",&nResult);
    std::cout<<"returnresultis"<<nResult<<std::endl;

    //8、结束python接口初始化
    Py_Finalize();
}
编译
Python3调用C++
Python调用C++的方式包括但不限于以下几种:
1) 使用ctypes模块:ctypes是Python标准库中的一个模块,可以用来调用动态链接库中的C函数。可以将C++代码编译成动态链接库,然后在Python中使用ctypes调用其中的函数。 2) 使用SWIG:SWIG是一个开源工具,可以将C++代码转换成Python模块。使用SWIG可以将C++代码封装成Python模块,然后在Python中直接调用。 3) 使用Boost.Python:Boost.Python是一个C++库,可以将C++代码封装成Python模块。使用Boost.Python可以将C++代码封装成Python模块,然后在Python中直接调用。 4) 使用Cython:Cython是一个Python扩展模块,可以将Python代码转换成C代码,然后编译成动态链接库。可以使用Cython将C++代码封装成Python模块,然后在Python中直接调用。
使用ctypes调用C++
步骤:
1) 编写C/C++程序; 2) 将C/C++程序编译成动态库; 3) 在Python中调用编译生成的库。
编写C++程序
由于C++支持函数重载,在g++以C++方式编译时编译器会给函数的名称附加上额外的信息,这样ctypes模块就会找不到g++编译生成的函数。 因此,要让g++按照C语言的方式编译才可以找到生成的函数名。让编译器以C语言的方式编译就要在代码中使用extern关键字将代码包裹起来。
#include <iostream>
#include <vector>

class Test {
private:
    double _calculate(int a, double b);

public:
    double calculate(int a, double b, char c[], int *d, double *e, char **f);
};

double Test::_calculate(int a, double b) {
    double res = a + b;
    std::cout << "res: " << res << std::endl;
    return res;
}

double Test::calculate(int a, double b, char c[], int *d, double *e, char **f) {
    std::cout << "a: " << a << std::endl;
    std::cout << "b: " << b << std::endl;
    std::cout << "c: " << c << std::endl;
    std::cout << "d: " << d[0] << d[1] << std::endl;
    std::cout << "e: " << e[0] << e[1] << std::endl;
    std::cout << "f: " << f[0] << f[1] << std::endl;
    return this->_calculate(a, b);
}


// 封装C接口
extern "C" {
// 创建对象
Test *test_new() {
    return new Test;
}
double my_calculate(Test *t, int a, double b, char c[], int *d, double *e, char **f) {
    return t->calculate(a, b, c, d, e, f);
}
}
将C/C++程序编译成动态库
将上面的代码编译成so文件
g++ -shared -Wl,-soname,test -o test.so -fPIC test.cpp
编译参数说明:
- -shared:生成共享库文件;
- -Wl,-soname,test:指定共享库的 soname 为 test;
- -o test.so:指定输出文件名为 test.so;
- -fPIC:生成与位置无关的代码,用于动态链接库。
同级目录下生成test.so文件。
在Python中调用编译生成的库
1
2
3
4
5
6
7
8
9
10
11
12
13
14
15
16
17
18
19
20
21
22
23
24
25
26
27
28
29
30
31
32
33
34
35
36
37
38
39
40
41
42
43
44
45
46
47
48
49
# call_cpp.py文件
import ctypes
# 指定动态链接库
lib = ctypes.cdll.LoadLibrary('./test.so')
#需要指定返回值的类型,默认是int
lib.my_calculate.restype = ctypes.c_double

class Test(object):
    def __init__(self):
        # 动态链接对象
        self.obj = lib.test_new()

    def calculate(self, a, b,c,d,e,f):
        res = lib.my_calculate(self.obj, a, b,c,d,e,f)
        return res

#将python类型转换成c类型,支持int, float,string的变量和数组的转换
def convert_type(input):
    ctypes_map = {int:ctypes.c_int,
                  float:ctypes.c_double,
                  str:ctypes.c_char_p
                  }
    input_type = type(input)
    if input_type is list:
        length = len(input)
        if length==0:
            print("convert type failed...input is "+input)
            return null
        else:
            arr = (ctypes_map[type(input[0])] * length)()
            for i in range(length):
                arr[i] = bytes(input[i],encoding="utf-8") if (type(input[0]) is str) else input[i]
            return arr
    else:
        if input_type in ctypes_map:
            return ctypes_map[input_type](bytes(input,encoding="utf-8") if type(input) is str else input)
        else:
            print("convert type failed...input is "+input)
            return null

if __name__ == '__main__':
    t = Test()
    A1	= 123;
    A2	= 0.789;
    A3	= "C789";
    A4	= [456,789];
    A5	= [0.123,0.456];
    A6	= ["A123", "B456"];
    print(t.calculate(convert_type(A1), convert_type(A2), convert_type(A3),convert_type(A4),convert_type(A5),convert_type(A6)))
运行call_cpp.py,结果如下:
使用SWIG调用C++
SWIG(Simplified Wrapper and Interface Generator)是一个开源的软件工具,用于将C/C++代码转换为其他高级编程语言(如Python、Java、Ruby等)的接口。SWIG可以帮助开发人员将现有的C/C++代码集成到其他语言的应用程序中,从而提高代码的重用性和可移植性。 由于SWIG是开源软件,存在潜在的风险(安全漏洞、不稳定性、兼容性问题等),在项目中不做考虑。
使用Boost.Python调用C++
在Python中,直接使用C语言代码是很容易的,用ctypes即可。 而如果需要使用C++的类、对象、方法、虚函数等高级语言特性,则没那么简单。而 Boost::Python 就是一个高度封装好的 Python / C API,它能简化 C++ 代码,使得为 Python 编写 C++ 扩展更为简单方便。甚至还能以 OOP 风格在 C++ 中编写 Python 对象的操作。 用Boost做Python 和 C++ 接口的好处是不用修改C++的代码,只需要单独再写一个wrapper就好了,很方便。
安装Boost库
Boost官网 首先,安装Boost库。机器上有装好的Boost,这里略过安装。 查看Boost版本:cat /usr/include/boost/version.hpp | grep "BOOST_LIB_VERSION"
注意:Python版本与Boost版本的匹配。这里Boost版本是1_53,对应Python2。Python3需升级Boost,使用方式不变。 下面的例子都是用Python2来演示。
导出简单函数
实现test2.cpp如下
#include <boost/python/module.hpp>
#include <boost/python/def.hpp>
using namespace boost::python;

int Add(const int x, const int y)
{
    return x + y;
}

int Del(const int x, const int y)
{
    return x - y;
}

BOOST_PYTHON_MODULE(test2)
{
    def("Add", Add);
    def("Del", Del);
}
其中,BOOST_PYTHON_MODULE的参数为要导出的模块名字,编译命令如下:
1
g++ test2.cpp -fPIC -shared -o test2.so -I/usr/include/python2.7 -I/usr/local/include -L/usr/local/lib -lboost_python
注意: 编译时需要指定boost头文件和库的路径,我这里分别是/usr/local/include和/usr/local/lib
同级目录下,生成test2.so
进入该目录,验证如下:
导出类
test3.cpp实现如下:
#include <boost/python.hpp>
using namespace boost::python;

class Test
{
    public:
        int Add(const int x, const int y)
        {
            return x + y;
        }

        int Del(const int x, const int y)
        {
            return x - y;
        }
};

BOOST_PYTHON_MODULE(test3)
{
    class_<Test>("Test")
        .def("Add", &Test::Add)
        .def("Del", &Test::Del);
}
编译:
1
g++ test3.cpp -fPIC -shared -o test3.so -I/usr/include/python2.7 -I/usr/local/include/boost -L/usr/local/lib -lboost_python
测试如下
导出变参函数
test4.cpp实现如下
#include <boost/python.hpp>
using namespace boost::python;

class Test
{
    public:
        int Add(const int x, const int y, const int z = 100)
        {
        return x + y + z;
        }
};

int Del(const int x, const int y, const int z = 100)
{
    return x - y - z;
}

BOOST_PYTHON_MEMBER_FUNCTION_OVERLOADS(Add_member_overloads, Add, 2, 3)
BOOST_PYTHON_FUNCTION_OVERLOADS(Del_overloads, Del, 2, 3)

BOOST_PYTHON_MODULE(test4)
{
    class_<Test>("Test")
        .def("Add", &Test::Add, Add_member_overloads(args("x", "y", "z"), "something"));
    def("Del", Del, Del_overloads(args("x", "y", "z"), "something"));
    }
这里Add和Del函数均采用了默认参数,Del为普通函数,Add为类成员函数,这里分别调用了不同的宏,宏的最后两个参数分别代表函数的最少参数个数和最多参数个数
编译:
1
g++ test4.cpp -fPIC -shared -o test4.so -I/usr/include/python2.7 -I/usr/local/include/boost -L/usr/local/lib -lboost_python
测试如下:
导出带Python对象的接口
既然是导出为Python接口,调用者难免会使用Python特有的数据结构,比如tuple,list,dict,由于原生态方法太麻烦,这里只记录boost的使用方法,假设要实现如下的Python函数功能。
1
2
3
4
def Square(list_a)
{
    return [x * x for x in list_a]
}
即对传入的list每个元素计算平方,返回list类型的结果,代码如下:
test5.cpp实现如下
#include <boost/python.hpp>

boost::python::list Square(boost::python::list& data)
{
    boost::python::list ret;
    for (int i = 0; i < len(data); ++i)
    {
        ret.append(data[i] * data[i]);
    }

    return ret;
}

BOOST_PYTHON_MODULE(test5)
{
    def("Square", Square);
}
编译:
1
g++ test5.cpp -fPIC -shared -o test5.so -I/usr/include/python2.7 -I/usr/local/include/boost -L/usr/local/lib -lboost_python
测试如下:
boost实现了boost::python::tuple, boost::python::list, boost::python::dict这几个数据类型,使用方法基本和Python保持一致,具体方法可以查看boost头文件里的boost/python/tuple.hpp及其它对应文件
另外比较常用的一个函数是boost::python::make_tuple() ,使用方法如下:
boost::python::tuple(int a, int b, int c)
{
    return boost::python::make_tuple(a, b, c);
}
使用Cython调用C++
CPython是C语言开发的Python解释器。在命令行下运行python就是启动CPython解释器。Cython支持Python与C/C++代码的无缝集成,可以直接调用C和C++的函数和库。
安装Cython
1
pip install Cython
简单样例
样例中总共需要五个文件:
Rectangle.hRectangle.cppRectangle.pxdsetup.pyrect.pyx
定义.h和.cpp文件
- Rectangle.h
#ifndef RECTANGLE_H #define RECTANGLE_H namespace shapes { class Rectangle { public: int x0, y0, x1, y1; Rectangle(); Rectangle(int x0, int y0, int x1, int y1); ~Rectangle(); int getArea(); void getSize(int* width, int* height); void move(int dx, int dy); }; } #endif - Rectangle.cpp
#include <iostream>
 #include "Rectangle.h"

 namespace shapes {

     // Default constructor
     Rectangle::Rectangle () {}

     // Overloaded constructor
     Rectangle::Rectangle (int x0, int y0, int x1, int y1) {
         this->x0 = x0;
         this->y0 = y0;
         this->x1 = x1;
         this->y1 = y1;
     }

     // Destructor
     Rectangle::~Rectangle () {}

     // Return the area of the rectangle
     int Rectangle::getArea () {
         return (this->x1 - this->x0) * (this->y1 - this->y0);
     }

     // Get the size of the rectangle.
     // Put the size in the pointer args
     void Rectangle::getSize (int *width, int *height) {
         (*width) = x1 - x0;
         (*height) = y1 - y0;
     }

     // Move the rectangle by dx dy
     void Rectangle::move (int dx, int dy) {
         this->x0 += dx;
         this->y0 += dy;
         this->x1 += dx;
         this->y1 += dy;
     }
 }
编写.pxd文件
pxd 文件可以看成是Cython(即pyx文件)的头文件。
- Rectangle.pxd
cdef extern from "Rectangle.cpp":
     pass

 # Declare the class with cdef
 cdef extern from "Rectangle.h" namespace "shapes":
     cdef cppclass Rectangle:
         Rectangle() except +
         Rectangle(int, int, int, int) except +
         int x0, y0, x1, y1
         int getArea()
         void getSize(int* width, int* height)
         void move(int, int)
编写.pyx文件
pyx是C/C++与Python之间的桥梁,也就是pyx文件会将C/C++代码做一层包装,方便Python直接调用。
rect.pyx
1
2
3
4
5
6
7
8
9
10
11
12
13
14
15
16
17
18
19
20
21
22
23
24
25
26
27
28
29
30
31
32
# distutils: language = c++

 from Rectangle cimport Rectangle

 cdef class PyRectangle:
     cdef Rectangle*c_rect  # hold a pointer to the C++ instance which we're wrapping

     def __cinit__(self, int x0, int y0, int x1, int y1):
         self.c_rect = new Rectangle(x0, y0, x1, y1)

     def get_area(self):
         return self.c_rect.getArea()

     def get_size(self):
         cdef int width, height
         self.c_rect.getSize(&width, &height)
         return width, height

     def move(self, dx, dy):
         self.c_rect.move(dx, dy)

     def __dealloc__(self):
         del self.c_rect

 def main():
     rec_ptr = new Rectangle(1, 2, 3, 4)  # Instantiate a Rectangle object on the heap
     try:
         rec_area = rec_ptr.getArea()
     finally:
         del rec_ptr  # delete heap allocated object

     cdef Rectangle rec_stack  # Instantiate a Rectangle object on the stack
第一行
# distutils: language = c++会指定当前文件生成C++文件。pxd和pyx文件可以简单如下来理解:- pxd文件是pyx与C/C++之间的桥梁;
pyx是C/C++与Python之间的桥梁。
创建setup.py
要编译Cython模块,必须有一个setup.py
from distutils.core import setup

from Cython.Build import cythonize

setup(ext_modules=cythonize("rect.pyx"))
编译
1
python setup.py build_ext --inplace
执行命令后,在当前目录会生成rect.cpp,这个文件是根据rect.pyx生成的。同时还会生成rect.cpython-36m-x86_64-linux-gnu.so文件(Linux环境下对应so文件)。
测试
工具比较
ctypes(Python自带的库)
- 灵活
- 对C的代码几乎无缝调用
- 使用起来比较繁琐
- C++需封装成C接口
Boost.Python
- 支持 Python 2, 3和C++的绑定
- 对于新手来说,学习它的语法有一定难度,但是这些语法很直观
- 大量使用了 C++ templates,会很明显地提高编译时间
- 随boost库一起发布,且boost库有用,但很大
- 刚开始编译使用boost.python封装好的C++代码时,出现的各种错误
- 一些语法不易学习,像函数返回值时的规则
- 非常可靠、稳定、经过充分测试的库
- 不支持属性
- 支持文档写得比较差,有些功能文档里甚至都没有写
- 编译后的pyd文件有些大,不利于在手机或者嵌入平台使用
- 配合py++使用,几乎可以全自动封装项目
Cython
- 基于Pyrex,很多外部库的扩展用它写的
- 性能较高
- 接近于Python语法
- 需学习Cython语法,编写
.pxd、.pyx文件,有学习成本 不太流行
ctypes SWIG Boost.Python Cython 功能 C++支持不太好,需手动封装 C++支持不太好 C++支持好,非常可靠 C++支持好 易用性 比较繁琐 容易学习 语法有一定难度 需学习Cython语法 可靠性 高 低 高 高 安全性 高 开源软件,低 高 高 引入外部库 无 无 boost库(很大) Cython 流行程度 流行 流行 流行 不太流行